|
measuring Biomass
Basic Procedures for Directly Measuring Biomass
The basic idea of Direct or
Destructive methods are simply to remove and weigh
all the biomass occurring in several small areas or quadrats then estimating
biomass that occurs across the landscape, site, or pasture. The basic steps are
as follows:
 1) Select a quadrat
appropriate for the type of vegetation being sampled following guidelines of
quadrat shape and size outlined in
module
5.
Place quadrat along line or in location set by desired sampling
protocol. 1) Select a quadrat
appropriate for the type of vegetation being sampled following guidelines of
quadrat shape and size outlined in
module
5.
Place quadrat along line or in location set by desired sampling
protocol.
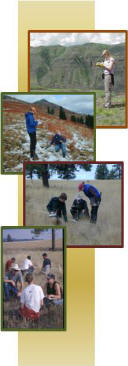
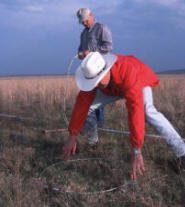
Measuring biomass in Oklahoma. Photo by Jeff Vanuga
(http://photogallery.nrcs.usda.gov) |
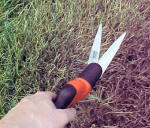 2) With a pair of clippers,
remove all vegetation in a three dimensional area above the quadrat.
Clip to ground level. Grass shears, sheep shears, power grass
shears, sickles, and hand lawnmowers equipped with grass catchers
can be used to accomplish clipping. 2) With a pair of clippers,
remove all vegetation in a three dimensional area above the quadrat.
Clip to ground level. Grass shears, sheep shears, power grass
shears, sickles, and hand lawnmowers equipped with grass catchers
can be used to accomplish clipping.
Photo from http://www.rittenhouse.ca/ |
|
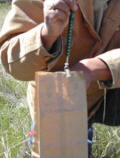 3) Weigh the vegetation
clipped. This can be done in the field and recorded on a data sheet.
Or, samples can be collected and brought back to the lab for
weighing. 3) Weigh the vegetation
clipped. This can be done in the field and recorded on a data sheet.
Or, samples can be collected and brought back to the lab for
weighing.
Photo
from Rangeland Monitoring in Western Uplands on
http://forestandandrange.org |
|
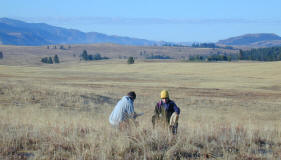 4) Clip enough quadrats to
capture the variation in biomass across the landscape of interest.
The more variation among plots placed across the area -- the more
plots will need to be clipped. 4) Clip enough quadrats to
capture the variation in biomass across the landscape of interest.
The more variation among plots placed across the area -- the more
plots will need to be clipped.
Clipping biomass in Idaho. Photo by K. Launchbaugh
|
| 5) Dry biomass
samples, or a sub-set of plots clipped, in a forced air oven.
Alternatively, fresh field weights can be converted to dry weights based on
"book
values" . |
 6) Convert grams of dry mass
per quadrat to lbs/acre or kg/ha. 6) Convert grams of dry mass
per quadrat to lbs/acre or kg/ha. |
|
● Detailed
step-by-step guidelines for this 'clip-and-weigh' or
'harvest' method can be found on pages 112-115 of the Interagency
Publication
Sampling
Vegetation Attributes |
Considerations for Clip-and-Weigh Techniques
- Clipping vegetation to ground level and then weighing it is the most
direct and objective way to measure herbaceous biomass.
- Though “clip-and-weigh” methods are highly accurate, they are quite time
consuming. Therefore, harvest techniques are usually combined with indirect
estimation techniques in methods known as “double
sampling”.
- Before clipping, the field technician must clarify which plants in a
plot will be clipped.
● All plants or just forage plants?
● Current season’s growth or total
standing crop?
● All plants rooted in the plot or
those that occur within or above the perimeter of the quadrat? Most
researchers believe that plants within or in a vertical projection above the
perimeter should be sampled. However, in grasslands, it is usually easier to
clip all stems rooted in the plot and not worry if they hang into or out of
the plot.
● Will species be clipped and weighed
separately, will plants be clipped by functional group (e.g., cool season
grasses, annual forbs, etc.) or will all plants be clipped and weighed?
Weighing and Drying Harvested Material
- The weight of clipped plant material includes water inside the plant
(within and between cells) and water on leaves and stems such as dew and
precipitation. Therefore, the weight of freshly harvested plant material is
highly variable and depends on recent weather, atmospheric conditions, and
the water status of the plant. For more meaningful interpretation of
production, phytomass is expressed on an air-dried or oven-dried basis.
- Generally, the weight of all fresh, or “green”, samples are weighed in
the field and then a subset of these samples are brought back to the lab to
be oven-dried. Alternatively, all the samples can be collected and brought
back to the lab and dried.
- Once a sample is dried the % dry matter = (Dry Wt./Fresh Wt.) *100 where
the “Dry Wt.” is the weight of the sample after oven drying and “Fresh Wt.”
is the weight of the sample recorded in the field.
- Recommended Drying Procedure:
(1) Dry sample within 24 hours of clipping. The sooner the better.
(2) Place samples (in paper bags) in a forced-air oven 140-160°F
(60-70°C)
(3) Most samples will take 24-48 hours to dry.
(4) To determine if a sample is dry, a few bags can be removed from the
oven, weighed and then returned to the oven. A few hours later, (4-8 hours)
the bags can be removed again and weighed. Samples are dry when no changes
in weight occur between reweighing. This is called “drying
to a constant weight”.
(5) Once a sample is dried, it must be stored in a dry place or it will
absorb atmospheric moisture and gain weight.
(6) Air-dried samples are sometimes used to compare production. If an oven
is not available and if samples are collected in a very dry environment
(where molding is unlikely), the samples can be placed in a dry warm place
to dry-out over several days to reach an “air-dried”
weight.
Estimated Dry Weights
If it is extremely difficult to dry samples, a few
book values
or “rules-of-thumb” can be used to convert fresh field weights to dry mass:
Grass:
● before heading
= 35 to 30% dry matter (or 65 to 70% moisture)
● headed out = 35 to 40%
dry matter
● after bloom = 45 to 50%
● mature seeded = 55
to 60%
● leave dry/stem partly dry
= 80 to 85%
● apparent dormancy =
90 to 95%
Forbs:
● very lush =
15 to 20%
● mature, seed-stage =
35 to 40%
● seed ripe, leaves drying =
60%
● dry and dormant = 90
to 100%
Shrubs/Trees (deciduous):
● lush new
leaves = 20 to 35%
● older, full-sized leaves
= 50%
Shrubs/Trees (evergreen):
● lush new
leaves = 55%
● older, full-sized leaves
= 65%
Conversions from Plot to Landscape
Plots are generally clipped and weighed in grams. Then, drying or estimating
procedures convert field weights to dry weights in grams/plot. However, to be
useful for reporting information, biomass should be expressed in pounds per acre
or kilograms per hectare. Here are a few useful conversions taken from the
National Range and Pasture Handbook (Chapter 4 page 4-6).
To convert grams per plot to pounds per acre, use the following
conversions:
● 0.96 ft2 plots
then multiply grams by 100
● 1.92 ft2 plots
then multiply grams by 50
● 2.4 ft2 plots
then multiply grams by 40
● 4.8 ft2 plots
then multiply grams by 20
● 9.6 ft2 plots
then multiply grams by 10To convert
grams per plot to kilograms per hectare, use the following conversions:
● 0.25 m2 plots
then multiply grams by 40
● 1 m2 plots
then multiply grams by 10
● 10 m2 plots
then multiply grams by 1 |
Other Useful Conversions:
 |
|