| |
CETL | Canvas | AI Guide | Course Design | Online | Software | Workshops
Handling Incompletes (Instructor Help)
"Past Enrollment" Status
After a semester ends, Canvas "for credit" courses in that past semester are automatically transitioned from “Active” to “Past Enrollment” by the placement of an End Date in the course Settings area.
Switching to “Past Enrollment” status for these previous semester courses helps reduce the number of courses displayed in each student's Dashboard, while maintaining instructor editing and course copy access. "Past Enrollment" differs from "Active" courses in the following ways:
|
|
|
- student access to the course switches to read-only
- student submissions are disallowed
- “Past Enrollment” courses do not display on student Dashboards (but can be accessed through Courses > All Courses)
Switch Course Status to "Active"
Follow the steps below to switch a "Past Enrollment" Canvas course status to "Active" if you wish to allow students with incompletes to continue submitting work through a Canvas course from a past semester. (Note: This change switches a "Past Enrollment" course to "Active" for ALL students enrolled, not just the students given incompletes.)
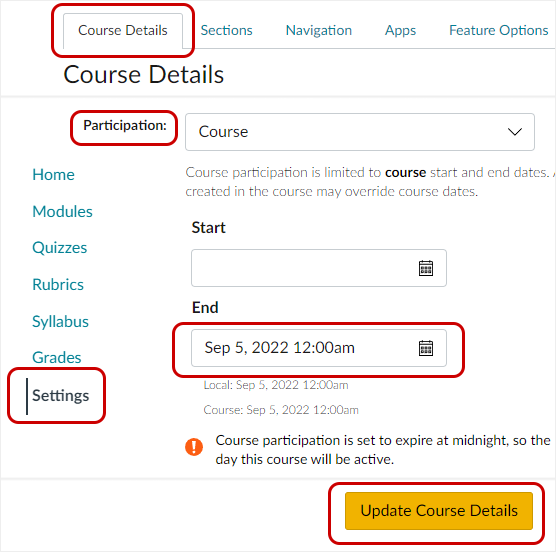
- Go to Settings in your course
- Scroll down to Participation and remove or extend the End Date of the course
- Press Update Course Details at the bottom to save
Extend Course Assessment Due Dates
Once you have a past semester Canvas course status switched back to "Active", you may also need to extend some of the assessment due dates in that course to allow students with incompletes to continue submitting their work.
Extend Assignment Due Dates
- Edit the assignment to get to the Assignment Settings
- Look for an Assign to: card at the bottom of the page. This card will be assigned to Everyone. (don't change this)
- Below the available dates, look for a +Add button and select it to add an additional Assign to: card.
- In the new card's Assign to field, select the student or section's name from the dropdown list. Note: After selecting the name of the student or section, the first card's Assign to field will change from Everyone to Everyone Else.
- Enter from and until available dates.
- Enter a due date.
- Click Save or Save & Publish.
Extend Quiz Due Dates
-
Edit the quiz to get to the Quiz Settings
- Scroll down to the "Assign to" block
- Leave Everyone alone and instead click the +Add button at the bottom of the block to create a new "Assign to" block.
- In the new block, select the desired student
- Assign the desired date and time
- Press Save
U of I Academic Procedures -"Incomplete" Grades
A grade of "Incomplete" is assigned only when the student has been in attendance and has done passing work up to a time within three weeks of the close of the semester, or within one week of the close of the summer session. It may be assigned only upon agreement of the student and course instructor when extenuating circumstances make it impossible for the student to complete course requirements on time. (Extenuating circumstances include serious illness, car accidents, death of a family member, etc. It does not include lateness due to procrastination, the student’s desire to do extra work to raise his/her grade, allowing a student to retake the course, etc.)
Final grades for incompletes received in the Fall semester or Intersession, must be assigned by the last day of the following Summer semester. Final grades for incompletes received in the Spring semester or Summer Session, must be assigned by the last day of the following Fall semester.
SOURCE: Grades of Incomplete (University of Idaho)
|

 INSTRUCTORS