| |
CETL | Canvas | AI Guide | Course Design | Online | Software | Workshops
Panopto (Instructor Help)
What is Panopto?
Panopto is a Video Streaming Platform integrated with Canvas. It was adopted by the university in the summer of 2023 to provide a reliable, accessible solution for video (and audio) delivery to our students. Panopto ...
|
|

|
Access to Panopto is ONLY available through Canvas. You must be signed into Canvas to create, save, and view videos stored in Panopto.
Video Storage Comparison
| Video Storage Platform |
Closed Captioning |
FERPA Compliant |
Enhanced Engagement |
In-Depth Analytics |
Trim & Edit Video |
| Panopto |
 |
|
|
|
|
| Canvas |
 |
|
|
|
|
| OneDrive |
|
|
|
|
|
| Vimeo Basic |
|
|
|
|
|
| YouTube |
|
|
|
|
|
Deliver Videos with Panopto Through Canvas
Choose the left or right option below:
| Add Videos to Modules |
Embed Videos in Pages |
- Go to Modules
- In the desired Module's header bar (right side), press the '+' to create a new item
- Choose External Tool from the pulldown menu
- Select Panopto Video
- Select one of the three tabs (Choose, Upload, or Record) and follow its directions
- Press Insert
- Press Add Item
- Publish for student access (click the circle icon located on the right so it turns green)
- Learn more: Adding Panopto Videos to Canvas Modules
|
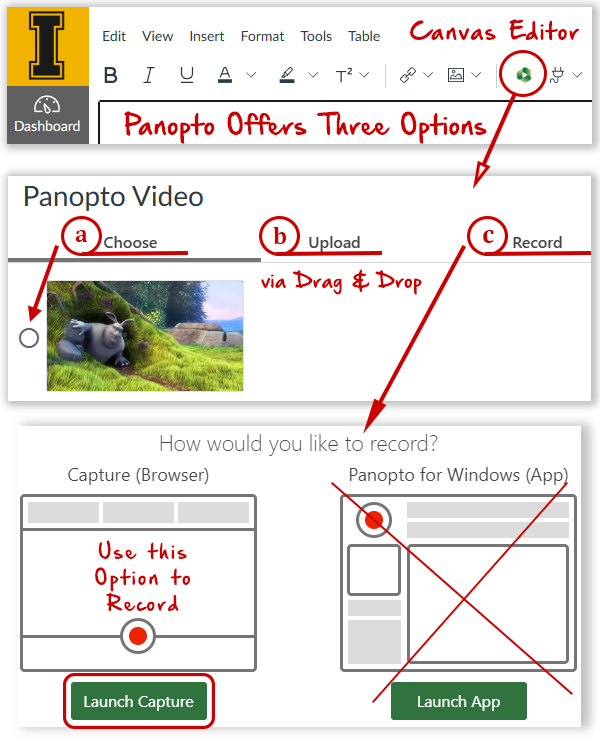
- Enter the Editor in Canvas (e.g., Edit a Canvas Page)
- Select the green "Panopto" logo icon (
 ) from the Editor menu ) from the Editor menu
- Select one of the three tabs (Choose, Upload, or Record) and follow its directions
- Press Insert to embed the video
- Press Save to exit out of Edit Mode
- Post the Page to a Module
- Publish for student access (click the circle icon located on the right so it turns green)
- Learn more: Embedding Panopto Videos in Canvas Pages
|
TIP for uploading a video into Panopto
Wait until Panopto's upload bar is complete. You do not have to wait for Panopto's processing to complete because Panopto processes videos in the background. (Processing time ranges from 1.5 to 3 times the length of the video.) Once processing is complete, you may Trim Your Panopto Video.
|
Create Assignments that Incorporate Video
"Step-by-Step" Tutorials
Visit Panopto's Searchable Help for additional topics.
Record a Video using Panopto
- Enter the Editor in Canvas (e.g., Edit a Canvas Page)
- Select the green "Panopto" icon () from the menu
- Select Record (3rd option over)
- Select Capture (Browser) to record online (left option)
Note: If you wish to record/edit offline using your desktop
computer's hard drive, install one of Panopto's Desktop Apps (Panopto For Windows, Panopto for Mac) instead of using the Capture (Browser) option recommended above. Learn about the differences between the various Panopto Recorders.
Capture Settings
Click the Gear icon ( ) in the lower right-hand corner of the screen to enter Settings (shown below). ) in the lower right-hand corner of the screen to enter Settings (shown below).
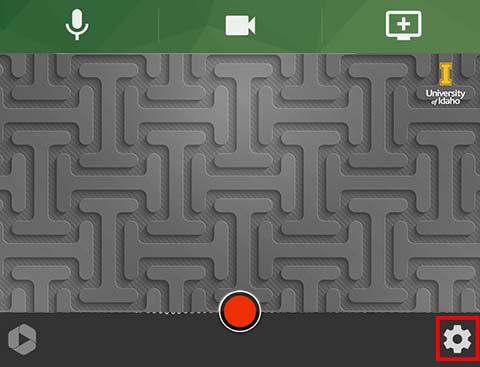
- Select High Definition (HD) (1920x1080 @ 30 frames/sec) for recording quality
- Under Video layout, adjust how streams appear by selecting Picture in Picture or Tile
- Select Blur background or use a Virtual Background
The default Virtual Background provided with Panopto for recording purposes is shown above. Panopto allows you to upload three additional backgrounds of your choosing. Note: The University of Idaho digital backgrounds distributed for use with Zoom can be used in Panopto (go to Download U of I Digital Backgrounds).
Learn more about Panopto's Capture Settings.
Record a Video "Offline" using Panopto
You do not have to be online (i.e., conneced to the Internet) to record Panopto videos. Panopto's Desktop Apps allow you to make recordings offline. These recordings are saved to your computer's hard drive and can be uploaded to Panopto at any time for distribution.
Panopto's Desktop Apps
How to Record Offline
- Install the appropriate Panopto Desktop App on your computer. Contact OIT for help with installing it on a U of I managed computer.
- Run the Panopto Desktop App
- Press OK, to indicate you wish to continue without signing in
- Press the Continue Offline button
- Record and Edit your videos
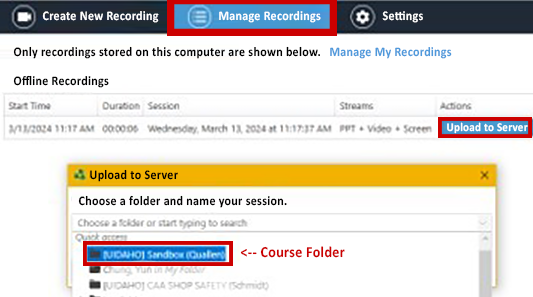
How to Upload Offline Recordings
- Sign in via the Panopto Desktop App (using your UI login)
- Go to Manage Recordings (shown below)
- Select which of your Course Folders to upload into
- Press Upload to Server
CETL One-On-One Support
Contact coursedesign@uidaho.edu to setup a one-on-one session with a member of the Center for Excellence in Teaching and Learning's Instructional Design Team:
CETL Workshops & "How to" Recordings

FERPA Guidance
If you wish to record lectures for use in later semesters, you must take steps to comply with FERPA. Record the course lectures in such a way that the students' identity in the course is never revealed. (e.g., Avoid recording student faces and/or names.) More Info: FERPA Guidance for Class Recordings.
|

 INSTRUCTORS